Faulknor Class Flotilla Leader (1914)
The four flotilla leaders of the Faulknor Class (sometimes referred to as the Botha Class) were completed between 1914 and 1916.
| Overview of 4 vessels | |||||
|---|---|---|---|---|---|
| Citations for this data available on individual ship pages | |||||
| Name | Builder | Laid Down | Launched | Completed | Fate |
| Botha | J. Samuel White | 2 Dec, 1914 | To Chile May, 1920 | ||
| Broke | J. Samuel White | 25 May, 1914 | To Chile May, 1920 | ||
| Faulknor | J. Samuel White | 26 Feb, 1914 | To Chile May, 1920 | ||
| Tipperary | J. Samuel White | 5 Mar, 1915 | Sunk 1 Jun, 1916 | ||
Machinery
Generators
In 1916, it was stated that flotilla leaders have two 26.25 kw dynamos arranged in parallel with an additiona 9 kw oil-fired set for emergency use.[1] It is likely but not certain that this applied to this earlier class.
Armament
4-in Guns
The ships carried six 4-in Q.F. Mark VI 45cal guns[2][3] on P. XI mountings.[4] These guns could elevate 25 degrees and the sights were ranged to 11,700 yards.[5]
In March, 1918, four of Broke's 4-in guns were replaced by two 4.7-in B.L. guns on C.P. VI mountings. The other ships were later similarly equipped.[6] These weapons could elevate 30 degrees and were sighted to 16,00 yards.[7]
Other Guns
One 1-pdr (or 1.5-pdr) H.A. gun and two .303-in Maxim machine guns.[8][9] In Botha and Tipperary, at least, the 1.5-pdrs were later replaced by 2-pdrs Mark I.[10]
When three of the ships served at Dover after the loss of Tipperary, their 4-in guns were outranged by German destroyer guns, prompting the exchange in March 1918 of two 4.7-in B.L. Mark I guns on C.P. VI mountings capable of 30 degree elevation for the fore and aft 4-in weapons. With a range of 16,000 yards as opposed to 12,000, the ships were much more dangerous, but weight considerations prevented a complete change to 4.7-in guns.[11][12]
Plates XII and XIII in the Handbook of Fire Control in Torpedo Boat Destroyers of "M" Class and Later and Flotilla Leaders, 1915 (see below) seem to indicate that Botha and Tipperary were then mounting single guns (4-in, presumably) on centre line fore and aft, and four on the broadsides. This better arrangement was perhaps attributable to their different torpedo arrangements (see below).[Inference]
Torpedoes
The ships carried four 21-in tubes in two different schemes.[13]
Faulknor and Broke:
- Four Single Revolving 21-in torpedo tubes, two on each broadside
Botha and Tipperary:
- Two Double Revolving mounts, one on each broadside
Fire Control


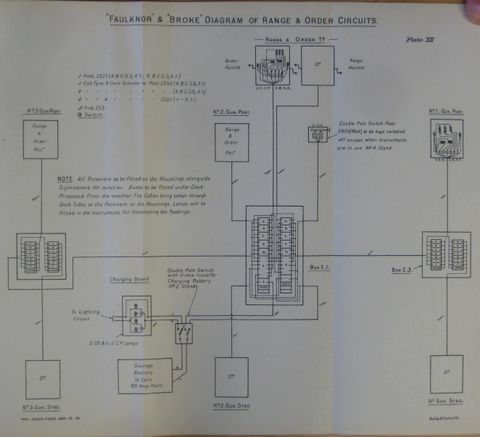
By the end of 1915, at least, these ships had or were to be provided a range and order data system similar recent Barr and Stroud patterns.[16]
The scheme placed the combined transmitter on the forebridge (two on Faulknor and Broke, apparently sending to the two broadsides separately), and a combined receiver near the sightsetter position of each gun. Ranges from 0 to 9900 yards in increments of 100 yards, and orders were "Independent", "Control" and "Fire" with illuminated indicators and a red indicator to signal loss of power on the receivers.
Although one authoritative source claims that the ships did not actually receive directors,[17] the Director Firing Handbook, 1917 claims that Botha's Small Type Training Receivers were pattern number 20 on #1, P2 and S2, whereas P3, S3 and #4 had pattern number 21 and that Broke and Faulknor had these as pattern number 20 on P1, P2, S1, S2 and pattern number 21 on P3 and S3.[18] The 1918 handbook on the destroyer equipment also lists them as being equipped.[19]
Rangefinders
The ships featured two 7-foot rangefinders sited on the bridge forward and on the aft searchlight platform, which seems perverse.[20]
By 1921, it was reported that all R.N. destroyer leaders mounted a 9ft F.Q. 2 on an M.Q. 1, M.Q. 9 or M.Q. 12 mount on their fore bridge.[21]
Dreyer Table
These ships had no fire control tables.[22]
Torpedo Control
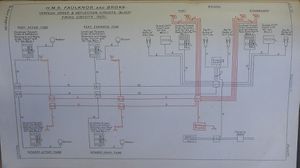
By 1917, at least, the ships had a pair of sighting positions on the bridge with electrical instruments tying them to the torpedoes situated on the port and starboard sides. The electrical firing arrangements were augmented by firing buzzers and rattlers.
See Also
Footnotes
- ↑ Annual Report of the Torpedo School', 1916', p. 120.
- ↑ Conway's All the World's Fighting Ships 1906–1921. p. 77.
- ↑ The Technical History and Index, Vol. 4, Part 34. p. 14.
- ↑ March. British Destroyers. p. 166.
- ↑ The Technical History and Index, Vol. 4, Part 34. p. 17.
- ↑ March. British Destroyers. p. 169.
- ↑ The Technical History and Index, Vol. 4, Part 34. p. 17.
- ↑ Conway's All the World's Fighting Ships 1906–1921. p. 77.
- ↑ March. British Destroyers. p. 166.
- ↑ March. British Destroyers. p. 169.
- ↑ Conway's All the World's Fighting Ships 1906–1921. p. 78.
- ↑ The Technical History and Index, Vol. 4, Part 34. p. 14.
- ↑ Conway's All the World's Fighting Ships 1906–1921. p. 77.
- ↑ Admiralty. Handbook of Fire Control in Torpedo Boat Destroyers of "M" Class and Later and Flotilla Leaders, 1915, Plate XII.
- ↑ Admiralty. Handbook of Fire Control in Torpedo Boat Destroyers of "M" Class and Later and Flotilla Leaders, 1915, Plate XIII.
- ↑ Admiralty. Handbook of Fire Control in Torpedo Boat Destroyers of "M" Class and Later, and Flotilla Leaders, 1915, p. 3.
- ↑ The Technical History and Index, Vol. 4, Part 34. p. 17.
- ↑ The Director Firing Handbook. p. 146.
- ↑ Director Firing For Flotilla Leaders and Destroyers. p. 55.
- ↑ March. British Destroyers. p. 166, caption to photo 21/1.
- ↑ Handbook for Naval Range-Finders and Mountings, Book I. p. 168.
- ↑ absent from list in Handbook of Capt. F.C. Dreyer's Fire Control Tables, p. 3.
- ↑ Annual Report of the Torpedo School, 1917. p. 210. Plate 80.
- ↑ Annual Report of the Torpedo School, 1917. p. 210. Plate 83.
Bibliography
- Admiralty, Gunnery Branch (1910). Handbook for Fire Control Instruments, 1909. Copy No. 173 is Ja 345a at Admiralty Library, Portsmouth, United Kingdom.
- Admiralty, Gunnery Branch (1918). Handbook of Captain F. C. Dreyer's Fire Control Tables, 1918. C.B. 1456. Copy No. 10 at Admiralty Library, Portsmouth, United Kingdom.
- Admiralty, Technical History Section (1920). The Technical History and Index: Alteration in Armaments of H.M. Ships during the War. Vol. 4, Part 34. C.B. 1515 (34) now O.U. 6171/20. At The National Archives, Kew, United Kingdom.
| Faulknor Class Flotilla Leader | |||||||||||||||||||||||||||||||||||||||||||||||||||||||||||||||||||||||||||||||||||||||||||||||||||||||||||||||||||||||
| Botha | Broke | Faulknor | Tipperary | ||||||||||||||||||||||||||||||||||||||||||||||||||||||||||||||||||||||||||||||||||||||||||||||||||||||||||||||||||||
| <– | H.M.S. Swift | Destroyer Leaders (UK) | Lightfoot Class | –> | |||||||||||||||||||||||||||||||||||||||||||||||||||||||||||||||||||||||||||||||||||||||||||||||||||||||||||||||||||

